The Code:
const int SWITCH = 9; //pin for the MOSFET

const int BUTTON = 7; //pin for the Button

const int LED = 13; //pin for the LED

int val = 0; //used to store state of input pin

int old_val = 0; //used to store previous value of val

int state = 0; //1 = LED off and 0 = LED on
void setup()
{
pinMode(SWITCH, OUTPUT); //Map output to MOSFET
pinMode(BUTTON, INPUT); //Map input to Button
pinMode(LED, OUTPUT); //Map output to LED
Serial.begin(300); //Initiate a data connection between the board and a computer
}
void loop()
{
val = digitalRead(BUTTON); //Read input value of Button and store it
//check for change in value
if ((val == HIGH) && (old_val == LOW)) {
state = 1 - state;
delay(10);
}
old_val = val; //store the old value
if (state == 1) {
Serial.println("OFF"); //send off message back to the computer
digitalWrite(SWITCH, LOW); //turn off flow of electricity to magnet
digitalWrite(LED, LOW); //turn off LED
} else {
Serial.println("ON"); //send on message back to the computer
digitalWrite(SWITCH, HIGH); //turn on flow of electricity to magnet
digitalWrite(LED, HIGH); //turn on LED
}
}
Wait! Â Although Arduino may sound like Italian slang for a part of the human body I assure you I’ve been occupying myself in other ways.
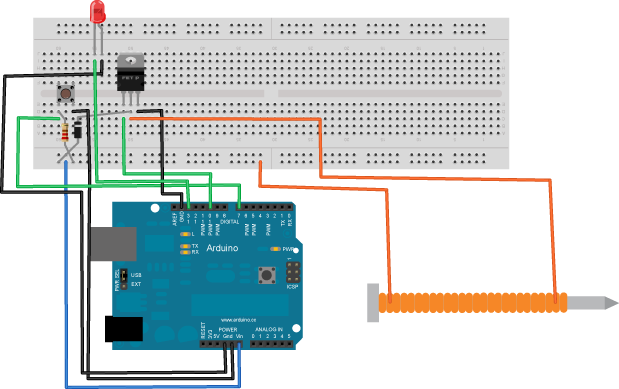
You may have heard of the Maker Movement and the wonderful interactive projects prototyped using these versatile little boards. Â Well, I finally jumped on board myself. Â If you look at the schematics to the right you will see the layout of my very first original project. Â About a month ago I was experimenting with home-made electromagnets and posted this video on Youtube. Â This weekend I integrated the electromagnet with Arduino controller. Â I’ve put together a video demonstration below showing it in action.
If I haven’t plugged it enough in the video, I really got a lot out of Massimo Banzi’s “Getting Started with Arduino” book. I believe it to be a must-read for any noob using these controller boards. The illustrations and examples are very simple to follow. I also referenced the Arduino web site: arduino.cc in the video.
Hi,
Really Thanks for sharing with us your project 🙂
I’m a student from Singapore.Now I’m doing a magnetic art work. And found your blog it’s really very helpful.
Is it possible to give me more details about it? like what kind of register should be used ? Because I follow your board design.But it didn’t work 🙁
Hope to receive your reply ! and thanks for taking time to read my ‘comment’.